


Dark, Pale, and Rose Lip Correction: Color Neutralization and Layered Implantation Strategy
Introduction
You've been there: a client with dark lips wants a natural pink result. You select a high-quality pink pigment, you execute the technique perfectly — and the result heals to something that's neither the natural pink you planned nor a pleasing version of the dark lip, but a muddy purple-brown that nobody wanted.
Or the client with pale, bloodless lips wants a soft warm tint. You apply the warm-toned pigment, and the result looks washed out and grey rather than warm and vibrant.
Or the client with naturally rose-tinted lips wants a natural-looking enhancement. You use what should be an appropriate color — and the rose tones in the skin interact with the pigment to produce an aggressive magenta effect that looks worse than the original lip.
These failures aren't technique failures. They're color science failures — the artist applied the target color without accounting for the fact that the lip's existing color was going to interact with the new pigment in ways that would distort the result. Problem lips aren't just "harder to work on" — they require a fundamentally different workflow: neutralize first, then color.
This article provides the complete correction framework: problem lip classification, complementary color neutralization principles, layered implantation technique, and the specific protocols for each problem lip type.
Problem Lip Classification: Know What You're Fighting
The Four Problem Lip Categories
Accurate problem lip classification is the foundation of successful correction work. Misidentifying the problem type leads to selecting the wrong neutralization strategy, which produces a worse result than if no correction had been attempted.
Cool Dark Lips (Ashy Purple-Toned)
The lip color presents as blue-purple or grey-purple, usually associated with slower peripheral circulation or elevated melanin concentration. This is the most challenging correction type because the purple base is cool-toned and sits opposite orange on the color wheel — but the darkness also requires a lighter-than-standard corrective approach, which can feel contradictory.
Warm Dark Lips (Brown-Toned)
The lip color is brownish-dark with warm undertones — the darkness here is primarily melanin-based rather than vascular. Warm dark lips respond better to warm-toned corrections than cool dark lips because the warm undertone in the lip itself creates a more compatible base for warm-toned pigment applications.
Rose-Tinted Lips (Magenta-Toned)
The lip color has a distinct pink-purple or magenta quality that's visible even in normal lighting. This is typically caused by underlying vascular patterns or pigment deposition patterns that are natural to the client, not by a pathology. Rose-tinted lips are correction-successful when handled correctly because the magenta tone is the complement of yellow — and yellow-based neutralization is well-established and predictable.
Pale Lips (Bloodless, Cool-Toned)
The lip color is significantly lighter than the client's natural skin tone would suggest, with a cool, almost greyish quality. This is the only problem lip type where the issue is deficiency rather than excess — the lip lacks color rather than having an interfering unwanted color. The correction strategy is warm-toned addition rather than neutralization.
Severity Grading: Why It Matters for the Procedure Plan
| Grade | Visual Characteristics | Correction Complexity | Expected Sessions |
|---|---|---|---|
| Mild | Slightly darker or paler than ideal; overall uniformity maintained | Low — single-session correction often sufficient | 1 |
| Moderate | Clearly distinct from target; some patchiness visible | Medium — layered implantation typically required | 1–2 |
| Severe | Deeply dark or severely pale; lip edge definition lost | High — multiple sessions with conservative first pass | 2–3 |
Moderate cases are the most common in practice and are the focus of the protocols in this article. Severe cases require the same principles applied more conservatively across more sessions.
Color Science: The Complementary Color Neutralization Framework
Why Complementary Colors Cancel Each Other Out
On the color wheel, complementary colors are those positioned 180 degrees apart — red and green, blue and orange, yellow and purple. When complementary colors are mixed or overlaid, they absorb each other's visible wavelengths, producing a neutral grey-brown — this is the physical mechanism of neutralization in lip correction.
In skin science terms, the unwanted color in the lip (the problem) has a specific visible wavelength. A corrective pigment with the complementary wavelength absorbs the problem wavelength, removing its visual contribution. The result is that the unwanted color disappears and only the corrective pigment's own color remains — which can then be the target color if properly selected.
The key insight is that neutralization doesn't add color — it removes the unwanted color. The corrective pigment isn't supposed to look good by itself; it's supposed to eliminate the problem color so that the subsequent target color layer can show correctly without interference.
The Correction Formulas for Each Problem Lip Type
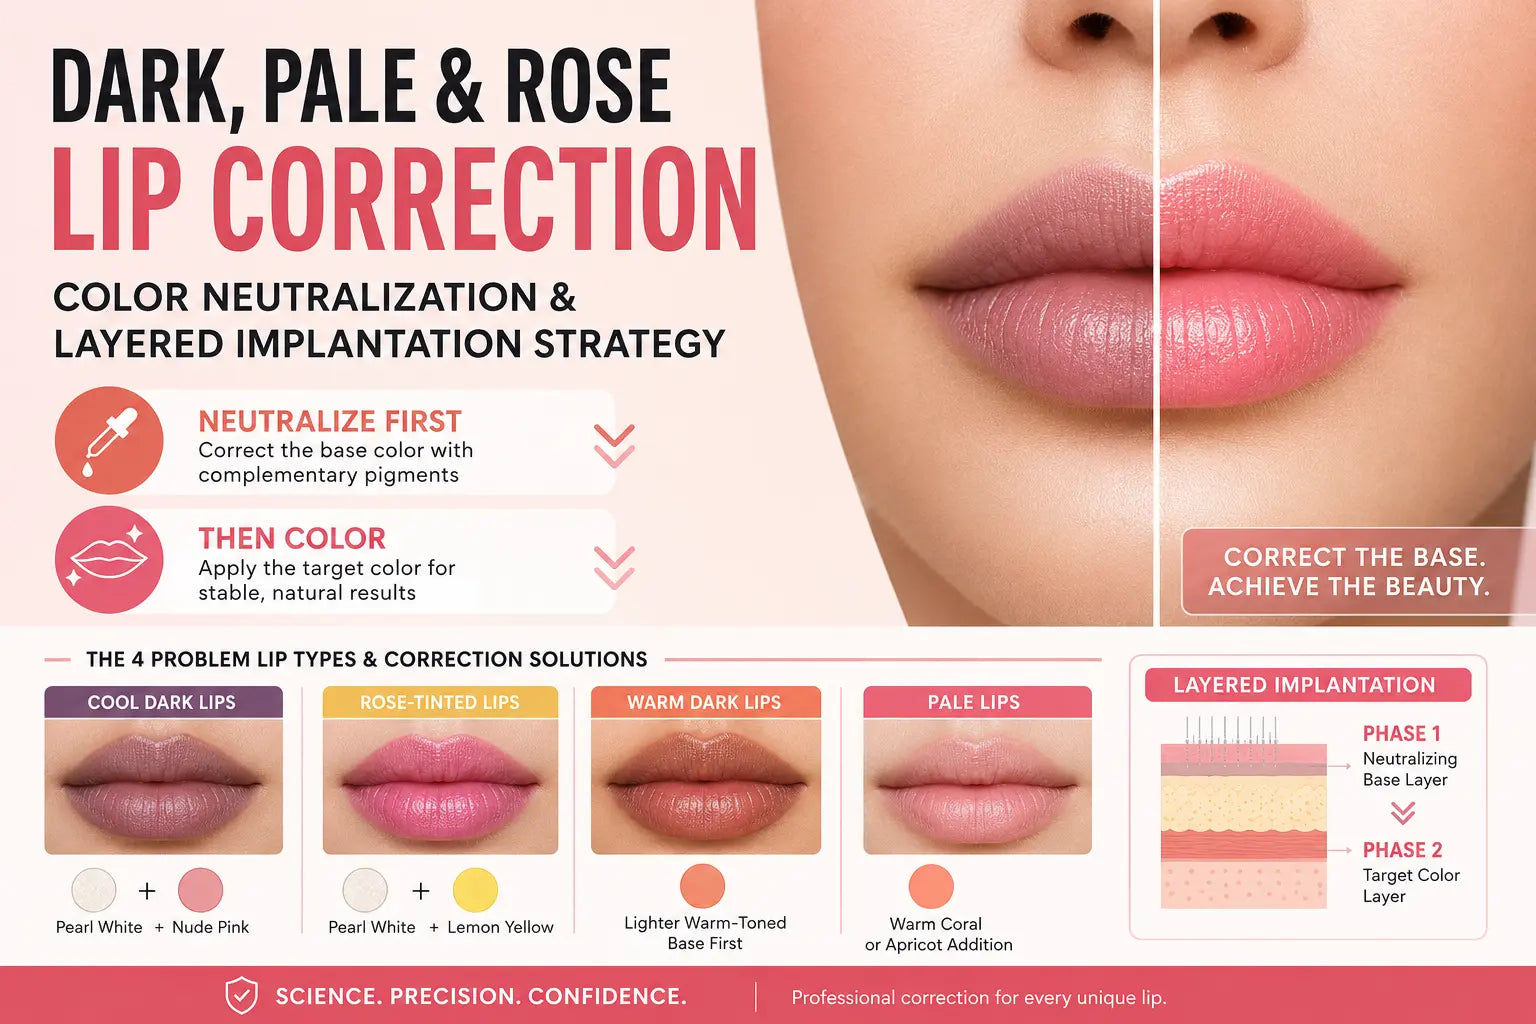
Cool Dark Lips — Pearl White + Nude Pink
Pearl white provides the lightening and cool-tone correction needed for the ashy purple quality, while nude pink adds a warm undertone to prevent the result from going too grey. Together, they shift cool dark lips toward a neutral, natural lip tone that can accept a target color overlay without the purple interference.
Rose-Tinted Lips — Pearl White + Lemon Yellow
Lemon yellow is the direct complement of magenta/purple — on the color wheel, purple sits between blue and red, and yellow sits opposite purple-blue. Lemon yellow absorbs the magenta wavelengths in rose-tinted lips and converts them to a warm neutral base. Pearl white lightens the overall tone to prevent the result from going too dark during neutralization.
Pale Lips — Warm Coral or Apricot Addition
Pale lips don't need neutralization — they need warmth and color addition. Using a warm coral or apricot pigment directly (without prior neutralization) builds the warmth and saturation that the pale lip lacks. The key is selecting a warm tone that's deep enough to be visible on the pale base without appearing jarring — this is where nano-scale pigments with strong penetration characteristics are essential.
Warm Dark Lips — Lighter Warm-Toned Base First
Warm dark lips are corrected by building a lighter warm-toned foundation rather than by neutralization in the traditional sense. The warm brown base in the lip is actually relatively compatible with warm-toned pigments — the challenge is the depth, not the tone. A lighter warm-toned pigment (peach, light coral) applied as a first layer lifts the overall darkness while maintaining warm undertone compatibility.
Layered Implantation: Why Single-Pass Correction Doesn't Work
The Problem with Single-Layer Correction
Single-layer correction attempts to achieve both neutralization and target color in one pass — mixing the corrective pigment with the target color and applying them together. This approach fails because the two jobs have different requirements that conflict when combined:
- Neutralization requires a specific concentration and tone of corrective pigment to be effective — diluting it with target color weakens the neutralization effect
- The target color needs to be applied at specific saturation to produce the desired result — but on top of a dark or discolored base, that saturation is unpredictable because the base color interferes with the final visual result
When both jobs are attempted simultaneously, neither is done well. The correction is insufficient and the target color appears wrong because it's being viewed through the unresolved interference of the problem base color.
The Layered Implantation Solution
Layered implantation separates the two jobs across two distinct phases:
Phase 1 — Neutralizing Base Layer: The first pass applies only the corrective pigment, concentrated at the appropriate level to fully neutralize the problem base. This layer is allowed to settle, and its effect is assessed before proceeding.
Phase 2 — Target Color Layer: Once the neutralizing base has been evaluated and confirmed to have achieved its goal, the second pass applies the target color. At this point, the base is already neutral — the target color appears exactly as it would on a "normal" lip, without interference.
The practical advantage of layered implantation is that it creates a decision point: if the neutralizing layer hasn't fully corrected the base, the artist can adjust before adding the target color, rather than committing to a result that might be wrong and then having to correct the correction.
How Brands Inform Their Correction Systems
The most comprehensive corrective pigment systems are developed by brands with decades of global market data — tracking which corrective approaches work on which ethnic skin types, which correction failures occur most frequently, and how to design formulations that address the specific correction challenges rather than generic color problems.
Biomaser's six-formulation system — covering powder through concentrate — was developed with this specific data set in mind, providing corrective pigments across the full viscosity range that allow artists to select the appropriate corrective formulation for the specific tissue characteristics of the problem lip they're working on. The corrective pigment matrix covers the neutralization formulas for all four problem lip types across the different formulation types needed for different skin and tissue conditions.
Technical Protocol for Each Problem Lip Type
Moderate Cool Dark Lip Correction Protocol
Base Assessment: Blue-purple undertone visible across the entire lip, including the lip edges. The lip may appear as though it has a blue-grey "veil" over it.
Neutralization Phase: Apply pearl white as the primary neutralizer with nude pink to provide warmth. Use a liquid or emulsion-form corrective pigment for maximum penetration — the nano-scale particles in liquid-corrective formulations reach the papillary dermis more efficiently, which is critical when working over the capillary-rich dark lip tissue.
Target Phase: After the neutralizing base has settled and been evaluated (usually within the same session, after allowing a brief settling period), apply the target color. For cool dark lips, the target color should be slightly warmer and slightly deeper than the eventual goal — the warmth compensates for the residual cool undertone in the neutralized lip, and the slight extra depth prevents the result from reading as too light once fully healed.
Key Parameters: Implantation depth 0.5–0.7mm (papillary dermis — not deeper, despite the dark appearance, which is not caused by depth but by pigment base color); use slightly slower puncture rate than standard lip work to allow the corrective pigment to fully integrate at each site.
Moderate Rose-Tinted Lip Correction Protocol
Base Assessment: Distinct magenta or purple-pink visible in all lighting conditions. The lip color does not change significantly under different light sources — the tint is structural to the lip tissue, not a lighting artifact.
Neutralization Phase: Apply lemon yellow as the primary neutralizer, combined with pearl white for lightening. The yellow directly absorbs the magenta/purple wavelengths — this is the most straightforward and reliable neutralization relationship in lip correction. Use cream-form corrective pigment for the yellow layer — cream form provides better adhesion on the vascular lip tissue and allows the yellow pigment to establish even coverage before the target color is applied.
Target Phase: Rose-tinted lips typically neutralize to a slightly warm neutral base. Target colors should be selected one shade warmer and one shade deeper than the final desired result, as the neutralized base tends to make subsequent colors appear slightly cooler and lighter than they would on an untreated lip.
Moderate Pale Lip Correction Protocol
Base Assessment: Lip color is noticeably lighter than the client's skin tone would suggest, with a cool greyish quality that suggests poor vascularity or low melanin activity. The lip may also appear slightly blue in the capillary-rich areas, suggesting thin skin overlying visible blood vessels.
Warm Color Addition Phase: No neutralization is needed. Apply warm coral or apricot directly as the base color layer. Use gel-form or cream-form pigment with nano-scale particle size — the penetration depth and saturation control of gel-form pigment is ideal for pale lip work, where the goal is building color from a deficient baseline rather than correcting an interfering one.
Target Phase: After the warm base has established the missing warmth and color foundation, apply the final target color. For pale lips, the target color can be slightly more saturated than on normal lips — the pale base absorbs more of the color than a normal lip would, so slightly higher saturation compensates for this absorption effect.
The Nano-Scale Pigment Advantage in Correction Work
Why Particle Size Matters More in Correction Than in Standard Procedures
In standard lip PMU, the client's baseline lip color is relatively neutral and doesn't actively compete with the pigment. In correction work, the baseline color is actively interfering with the new pigment — and the pigment particles that are large enough to be recognized and pushed toward capillary absorption will be, especially in vascular lip tissue.
Nano-scale pigment particles (0.020μm range) bypass this problem because they're small enough to avoid the capillary absorption pathway. They integrate into the dermal matrix rather than being processed through the vascular system, which means the corrective pigment stays where it's placed long enough to accomplish its neutralization function.
The practical implication: in correction work, always use the smallest particle size pigment available. The cost premium for nano-scale formulations is significantly lower than the cost of a failed correction procedure.
FAQ
Can I correct a dark lip in a single session or does it always require multiple sessions?
Moderate dark lips can often be significantly corrected in a single session using the layered implantation technique — the neutralization layer addresses the base color and the target color layer follows in the same session. Severe dark lips typically require at least two sessions: a conservative first pass to establish the neutralized base without over-correcting, and a follow-up session 6–8 weeks later to assess the healed result and add the target color once the neutralized base has been confirmed. Attempting to achieve full correction in one aggressive session on severe dark lips often produces over-correction, where the lip ends up too light rather than appropriately neutralized.
Why does the neutralized lip look darker right after the procedure than before?
This is normal. The neutralizing base layer — particularly when using warm-toned correctors on cool-toned lips — appears visually darker immediately post-procedure because the corrective pigment is sitting on top of the existing dark base. This is not the final result. Once the target color layer is applied on top and the healing process begins (4–6 weeks), the neutralized base integrates into the dermis and the overall result lightens to the intended level. If the lip is still darker than intended at the 6-week mark, a follow-up correction session can further lighten it.
Is layered implantation more painful than single-layer procedure?
Layered implantation involves two passes over the same area, which can increase tissue trauma compared to a single-pass procedure. However, the continuous layer technique — applying the neutralization layer and then moving directly to the target color layer without a long break — keeps the tissue in a state of mild anesthesia that most clients tolerate well. The overall procedure is slightly longer but not significantly more uncomfortable. Topical anesthetic applied 20–30 minutes before the procedure provides adequate comfort for most clients.
My client's pale lips turn grey after correction — what went wrong?
Grey appearance in corrected pale lips usually indicates the corrective pigment was applied too cool (containing blue or purple tones that were meant for other lip types) or was implanted too deep, causing vascular interaction to produce a grey cast. For pale lips, ensure the corrective or base pigment is purely warm-toned (coral, apricot, peach) with no cool component. Also verify that implantation depth is in the 0.5–0.7mm range — deeper than this and the vascular layer interaction will produce grey rather than warm pink results.
Should I adjust my aftercare recommendations for correction procedures compared to standard lip PMU?
The core aftercare principles are the same — keep the area clean, avoid heat and pool water, don't apply lip products in the first 24 hours. However, correction procedures involve more tissue trauma than standard lip PMU (two passes vs. one), so the inflammatory response may be slightly more pronounced in the first 48–72 hours. Cold compresses for the first few hours post-procedure are particularly beneficial for correction work, as they limit the vasodilation that can push corrective pigment particles laterally out of their intended dermal positions.
Key Takeaways
- Problem lips fail standard PMU pigment application because their baseline color actively interferes with the target color — not because the technique was wrong, but because the color science wasn't addressed before the technique was applied
- Color neutralization uses complementary colors on the color wheel to remove unwanted baseline tones — the corrective pigment's job is to eliminate the problem color, not to look good by itself
- Layered implantation separates neutralization and target color into two phases, allowing each to be executed optimally without the compromises that single-layer mixed application requires
- The four problem lip types (cool dark, warm dark, rose-tinted, pale) each have specific neutralization formulas: pearl white + nude pink (cool dark), yellow-based (rose-tinted), warm coral addition (warm dark), warm apricot addition (pale)
- Nano-scale pigment particles (0.020μm) are especially important in correction work — their small size prevents capillary absorption and vascular migration, which is the primary mechanism by which correction pigment fails to achieve its neutralization goal
- Moderate problem lips can often be corrected in a single session using layered implantation; severe cases typically require 2–3 conservative sessions rather than one aggressive attempt