
What Size Microbrush Should I Use for Lash or Brow Work?

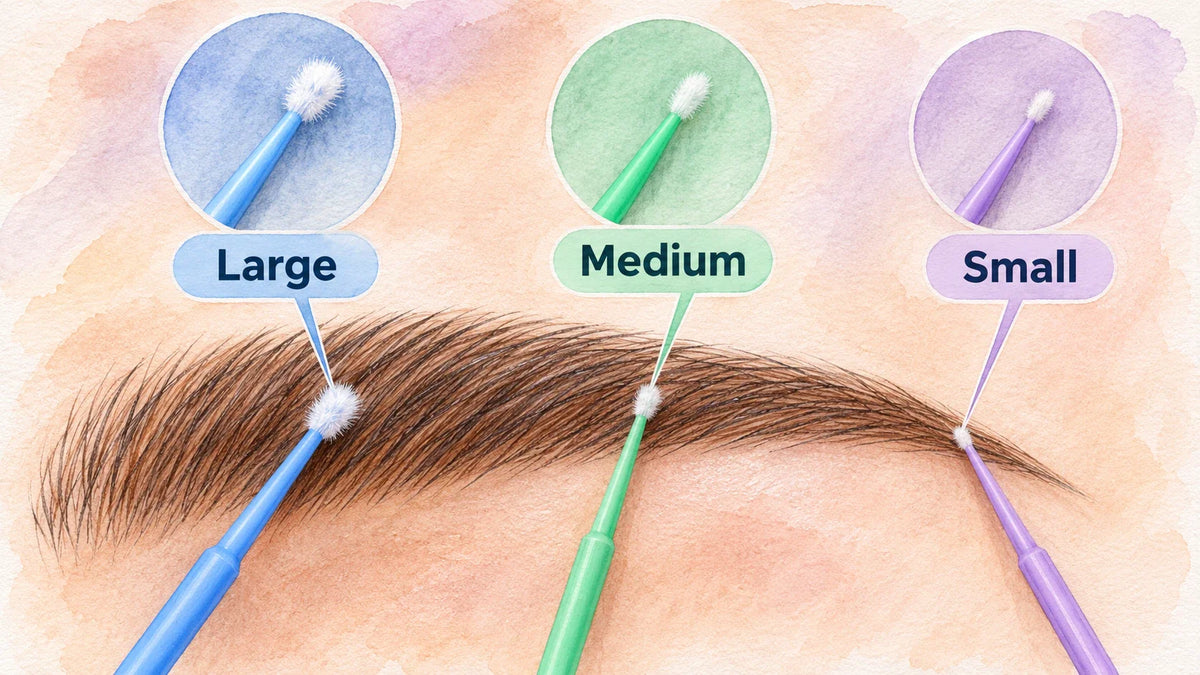
Choose a small microbrush for isolated lash or brow details, a medium tip for controlled coverage across a modest section, and a large tip for broader, accessible areas. Start by considering the area you need to touch and the nearby boundary you need to keep clear, then adjust when the tip covers too little or reaches too far.
Match the Target Area
The right size is the one whose working tip fits the target without hiding its edges. Size labels are relative, so compare the options in the set you are using rather than treating small, medium, or large as universal measurements.
- Small: Use it for a narrow brow tail, a tight edge, an isolated spot, or detailed lash work. Its smaller footprint gives better visibility and edge control, but it may require more passes across a wider area.
- Medium: Use it when you need a balance between coverage and precision. It suits a short brow section or another modest area where a small tip feels slow but a large tip would make the boundary harder to see.
- Large: Use it across a broader, accessible brow surface when covering more area per pass matters more than reaching a narrow edge. It is less suitable when the working area is tight or surrounded by areas that must remain clear.
The same brow can call for more than one size. A larger tip may be efficient across the broad middle section, while a smaller tip gives better control near the tail or along a narrow edge. The target changes, so the most useful size can change with it.
Balance Coverage and Precision
Microbrush size creates a tradeoff: a larger working footprint can cover more surface in each pass, while a smaller footprint makes it easier to stay inside a tight boundary. Choose based on the result you can observe while working, not on the idea that the smallest tip is always the most precise choice.
If you are making repeated narrow tracks across a broad target, the tip may be too small for that section. Try the next larger option if you can still see and control the boundaries. If the tip obscures the edge, reaches into an adjacent area, or feels difficult to place accurately, move down to a smaller option.
Size or loading?
A tip can fit the area correctly and still carry more product than you need. That is a loading problem, not automatically a size problem. If the tip reaches the intended area cleanly but leaves excess product, use less product on the same tip. Change size when the working footprint itself is wrong: too narrow for efficient coverage or too broad for boundary control.
This distinction prevents unnecessary size changes. A smaller tip does not automatically solve excess loading, and a larger tip does not automatically improve coverage if its footprint is too difficult to control.

Read the Set's Labels
Use the seller's own size key and judge the working tip rather than relying on handle color. Colors are not universal size codes, and the same color can represent a different option in another set.
For example, the Biomaser disposable micro applicators are supplied in a 100-piece pack with Purple-S, Green-M, and Blue-L options. In that set, the color-size key maps Purple to small, Green to medium, and Blue to large. The applicators are also described for applying lash conditioner in a fine line, which fits the small-tip decision when detailed lash work calls for a narrow working footprint.
Treat that mapping as a guide for that product, not as a general color standard. When comparing another pack, first identify which option is relatively small, medium, or large, then apply the same target-area rule.

A Quick Selection Check
Before choosing, ask three questions:
- How wide is the target? Choose small for an isolated or narrow area, medium for a modest section, and large for a broad accessible surface.
- How close is the boundary? Move smaller when nearby areas must remain clearly separated or the edge is difficult to see around a larger tip.
- What is actually going wrong? Move larger when coverage is inefficient because the tip is too narrow. Reduce loading when the tip fits correctly but carries too much product.
The best starting size is therefore not simply the largest or smallest option. It is the tip that covers the intended area at a workable pace while keeping the boundary visible and controllable.
